Introducing Tilt Shifted for iOS
Tilt-shift photography is a fun way to take photos. It allows you to show a beautifully understated type of emphasis or create a whimsical miniaturization effect. Of course, not everyone has cameras and lenses capable of taking these photos directly, so today we're introducing Tilt Shifted for iOS.
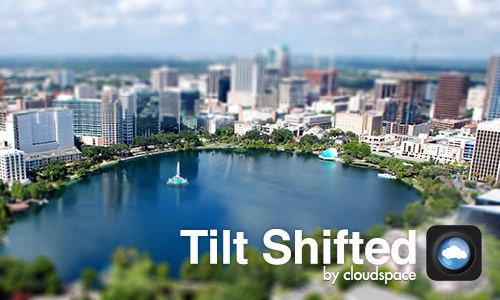
Tilt Shifted is an open source tilt-shift image creator available in the iOS App Store. With it you can take existing photos and apply a customizable tilt-shift effect, replicating the style you commonly would need expensive equipment to get. With Tilt Shifted and the touch of a finger, you can adjust the blur size and intensity, before sharing the resulting images with friends and family on Facebook, Twitter, or over Email!
We Made it for You!
While Tilt Shifted is an awesome app, we built it for more than just fun. Getting into image manipulation in Objective-C can be an intimidating task, so we wanted to provide a feature-complete, fully open source app highlighting the use of Apple's <UIKit/UIGraphics.h> and <QuartzCore/QuartzCore.h> libraries, camera and photo library interaction, as well as GPUImage (a fantastic GPU accelerated image manipulation library by Brad Larson).
The full source for Tilt Shifted is available on our GitHub repository so if you're interested take some time to check it out.
Under the Hood (alert: nerd stuff ahead)
At the heart of Tilt Shifted lies GPUImage. It handles the main gaussian blur effect used throughout the app. Since applying a blur can take a little bit of time, and users don't want to wait to adjust the blur level, we've implemented a little trick so that we only have to blur the image once. When you first select an image, a blurred copy is generated and stored in memory. Two UIViews are then placed on top of the original image, each containing a copy of the blurred image. As the user moves their finger around a UIPanGestureRecognizer tracks the movement and adjusts the amount that each blurred image is visible. To keep the image looking smooth a CAGradientLayer is applied to each overlay UIView's view.layer.mask property, making a nice gradual fade between the clear and blurred images.
When an image is shared or saved, we need to render a single JPEG from the multiple UIViews. To do this we re-create the same set of UIViews that are visible to the user, but scaled to the full image resolution instead of the phone screen. These UIViews are never added to the view hierarchy, so they exist but are never shown to the user. We then use the full-resolution parent UIView's renderInContext method to add a full-rendered version of the image (as a UIImage) to the UIGraphicsGetCurrentContext(). The resulting UIImage can then be used in the <Social/Social.h> frameworks, saved to the gallery, or turned into a JPEG NSData representation via UIImageJPEGRepresentation() and attached to a Mail message.
iOS 6 Layer Masks and renderInContext Issues
Unfortunately iOS (at least as of version 6.1) does not render layer masks. This makes the resulting images have the proper blurs, but with a hard edge instead of a nice fade. Getting around this was a bit complicated, but was solved with a few extra steps and some QuartzCore magic.
QuartzCore provides a way to apply a masking image over top of an existing image with CGImageCreateWithMask(), so we use this to build each individual piece we needed. Before the rendered view objects are assembled as described above, rendered gradients images (as opposed to CAGradientLayers) are generated with the following method we wrote:
- (UIImage *)renderGradientImageWithSize:(CGSize)size startPoint:(CGPoint)startPoint endPoint:(CGPoint)endPoint startColor:(UIColor *)startColor endColor:(UIColor*)endColor Then they are applied as a mask to appropriately cropped blurred images for the top and bottom with another method of ours:
- (UIImage *)applyMask:(UIImage*)mask toImage:(UIImage*)image Once the faded and blurred views are appropriately rendered to UIImages, we use them in the process described above to get a single full-resolution UIImage.
Have Fun!
Whether you're using Tilt Shifted to make crazy-cool images or to learn about different iOS graphics libraries, we hope you enjoy it. It was a blast to make and we love having the opportunity to provide feature-complete applications as examples for others to learn from. As said earlier, the full source code is available on GitHub, so take a look and let us know what you think!